Trim (You must use Windows 7 only with this drive!) Update: You can also use latest version of Ubuntu.
Inexpensive (comparatively)Cons: Setup and Tweaks: A lot of tricks and tweaks were required to get this working. Not recommended for someone without technical knowledge! See "other thoughts" for recommended tweaks.
Performance : This device will not perform at the same level as the Vertex 3 (but it currently costs 100 dollars less)!1) Set your bios to AHCI before installation (most modern mobos will automatically do this). Do not use IDE or Legacy mode!
2) Do not use any OS other than Windows 7. Anytime you delete data outside of Windows 7, the Trim command does not work, and your drive will flip garbage data around for who knows how long! During Windows 7 installation, do a "quick" NTFS format, not a "full" format! Never full format your SSD!
3) Once Windows is installed, open Device Manager and find your SSD. You will most likely see "inte" "marvel" or "nvidia" as the driver. Right click and choose update driver software. Choose "Browse my computer..." and "Let me pick from a list..." Continued BClick on the standard Microsoft AHCI driver 1.0.
4) After you install other drivers like video drivers, check your windows experience index score. This drive can score a 7.9 if everything is set up properly and you're using SATA III (6.0 Gbps). This also automatically tweaks windows 7 for your SSD (disabled defrag and such).
5) Now from Control Panel go to Hardware -> Power Options. Click "High Performace". If you don't want to use this power plan, visit the OCZ forums to learn how to prevent Windows from "sleeping" your SSD.
6) Finally, you need to adjust your page file. In System Properties, choose the "Advanced" tab. Under "Performance" choose the "Settings..." button. Click the "Advanced" tab again, and under "Virtual Memory" click the "Change..." command button. Uncheck Automatically manage size and select Custom « less
http://www.ab9il.net/windows-tips/windows-7-ssd-setup.html
Windows 7 Solid State Drive Setup
Obtaining Top Windows Performance and SSD Longevity
Windows 7 Optimizations
Windows 7 detects the presence of SSDs on installation and makes a couple of tweaks right from the start. Additional changes to the operating system settings enable one to set a performance level anywhere from moderate to the absolute maximum capability the hardware will provide. The goal is making better use of available RAM and minimizing writes to the SSD.
A Brief Word About TRIM
TRIM is command which directs the Windows operating system to mark, for re-use, areas with unused data on an SSD. The SSD then handles garbage collection tasks and maximizes space available for Windows to write new data. Without this semi-automatic clean-up and optimization function, solid state drives would be much slower. Modern chipsets have TRIM support built in; Windows should have TRIM running by default, but it is prudent to make sure it it actually running.
The presence of TRIM can be checked with a command line entry in Windows 7:
> fsutil.exe behavior query DisableDeleteNotify
If TRIM is running, the system will reply with:
> DisableDeleteNotify=0
If TRIM is not running, turn it on with the following command:
> fsutil.exe behavior set DisableDeleteNotify 0
Using an SSD Tweak Utility
With all the advice online for SSD hard drives, it can take hours of research and fiddling to properly configure your SSD drive. Manually going into menus is tedious and time consuming. The Free Elpamsoft SSD tweak utility allows you to configure Windows 2K/XP/Vista & 7 including x64 very quickly.
These functions should be optimized for solid state drives:
- System Restore
- Windows Defrag
- Use Large System Cache
- NTFS Memory Usage
- Disable 8.3 Filenames
- Disable Date Stamping
- Disable Boot Tracing
- Windows Prefetcher
- Windows Vista Superfetch
- Windows Indexing Service
- Enable Device-Initiated Link Power Management (DIPM) Support
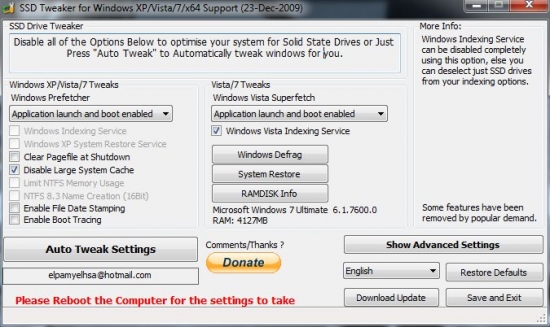
The main page offers the most common Windows SSD optimization settings. Some of the Windows services can’t be controlled with a simple checkbox in the software, but the SSD Tweak Utility has shortcuts for configuring Defrag and System Restore. Once clicked, those windows utilities are opened, and can be deactivated to reduce write events on the SSD.

The Advanced Settings area in the ssd tweak utility is where to find additional system adjustments. These are Windows features that consume resources and increase SSD writes; they can be easily disabled here.
Windows 7 Advanced Optimizations
Some of the more advanced steps can allow the Windows system and SSD to operate very fast and efficiently, but sometimes at the expense of convenience, visual appeal, or power consumption. It is suggested to try all of the performance enhancements, and determine which ones to keep enabled and which to discard.
Windows 7 God Mode: Easy Access to System Settings

Windows 7 and Vista have a feature which provides access to numerous system adjustments, called God Mode. To enable God Mode, for the purpose of enhancing solid state drive performance, follow these steps:
- Create a new folder on the desktop.
- Rename the folder to this: GodMode.{ED7BA470-8E54-465E-825C-99712043E01C}
- Bear in mind that the folder offers administrator privileged access to vital system settings. Be careful.
Windows Power Options
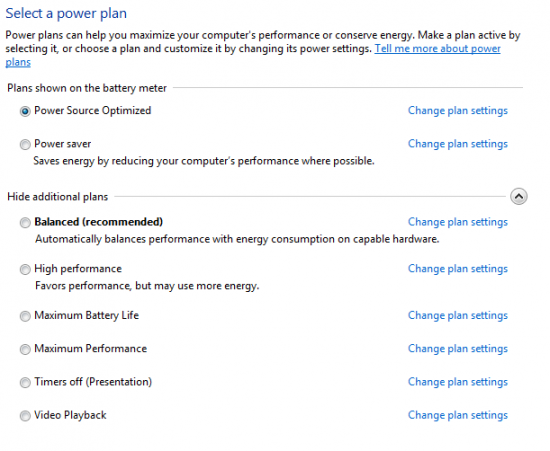
Windows Vista and Windows 7 both allow you to fine tune your power options. I don’t recommend running a notebook on the High Performance setting, but for desktop users looking to get the most out of their new SSD, it is a must. Once you have changed your setting to High Performance, go into the options under Hard Disk and select NEVER turn the drives off. This will allow your SSDs garbage collection to run even when you are logged off of the system.
Enable Write Caching

You can gain a nice performance boost by checking both of these boxes, but you also run the risk of losing data if power is lost while the computer is operating.
Disable Indexing

Having Windows 7 index your platter based drives gives you a boost in search performance, but since SSDs have such low access time, the feature is not needed to have speedy searches.
Disabling Defragmentattion Service
The Disk Deframenter .exe file is located at C:\Windows\System32\dfrgui.exe.
Solid State Drives (SSD) do not need to be defragmented. Doing so may shorten the lifespan of the SSD drive.
Disk Defragmenter will show all disks including SSDs. If you have the Disk Defragmenter schedule turned on, then be sure to check that the SSD has been excluded (unchecked).
Disk Defragmenter will show all disks including SSDs. If you have the Disk Defragmenter schedule turned on, then be sure to check that the SSD has been excluded (unchecked).

Solid state drives do not need the disk defragmentation service. Windows 7 should automatically disable this feature when it detected the SSD, but it is wise to verify that the service is not running.
Disable System Restore

Disabling System Restore increases both performance and available storage space. Be sure to regularly back up your data on a separate medium!
Disable Superfetch

Superfetch is designed to cache files used often, but with the low access times of SSDs this option can be disabled. Slower solid state drives will actually benefit with this option enabled as they begin to fill with data, due to write amplification. Most SSDs, however, benefit most with this service disabled.
Disable Prefetch
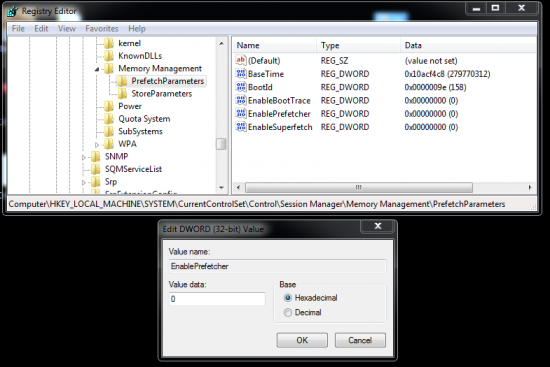
Prefetch loads pieces of program files into RAM and is one of the new tricks Microsoft has used to make Windows 7 seem faster to users. It is not needed on systems with solid state drives, and disabling prefetch makes more RAM available. Disabling prefetch requires changing the Windows registry with Regedit.exe. This is the registry key to change:
USE CAUTION WHENEVER EDITING THE WINDOWS REGISTRY!
HKEY_LOCAL_MACHINE\SYSTEM\CurrentControlSet\Control\Session Manager\Memory Management\PrefetchParameters
Accomplish these actions:
- Find Enable Prefetcher
- Right click on the right pane then choose modify
- Change the value from 3 to 0
- click "OK"
- Close Regedit
- Reboot for changes to take effect
Modern solid state drives enhance performance of old and new computers by orders of magnitude. Combined with ample memory and multi-core processors and graphics, computers can do in minutes what would have taken hours or days in the recent past. Solid state drives are still somewhat expensive and limited in capacity in comparison to conventional spinning platter drives, but the speed increase offsets the expense. Windows 7 can be made to work well with solid state drives, and far surpass its original "out of the box" performance.


